How to secure your Apple ID

Your Apple ID is of vital importance. It’s your link to everything Apple – your gateway to the company’s services. This includes whatever sits on your iCloud account, such as personal information in Mail, Calendar and Reminders. It extends to purchased content, like subscriptions, music, video, and apps.
If someone nefarious gets access to your Apple ID, they can wreak havoc. They may be able to steal your content, access your data, and worse. Any hijacking of your Apple ID could be very inconvenient, possibly disastrous if data was leaked, and even expensive if the perpetrator decides to change your login details and ‘ransom’ your Apple ID.
Lock down your Apple ID
Update your password
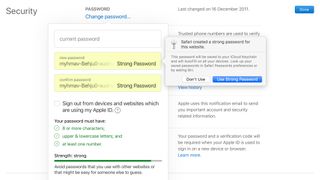
People don’t often give passwords much thought, but we’re long past the likes of ‘p6ssword’ being safe. If you now suddenly feel the need to update your Apple ID password, head to appleid.apple.com, sign in, and click 'Edit' next to the Security heading.
You’ll see when you last changed your password. If this was a long while ago and/or your password isn’t a complex string of numbers and letters (or a broadly random string of words), click 'Change password'. In the pane that appears, update your password, taking note of Apple’s rules regarding mandatory characters.
Ideally, use a password manager like LastPass, 1Password, or Safari’s built-in suggestion mechanism to create your new password. Keep it safe and secure (such as in a password manager, or an app secured using FaceID). Obviously, never use this password for any other account.
Also, if you’re updating your password because you believe your account has been compromised, use the option in the aforementioned pane to sign out from all devices and websites that are currently using your Apple ID.
Sign out of old devices
As you acquire more devices, your Apple ID will be tied to an increasing number of them. Prior to selling any device, you should sign out and securely wipe it. (For example, with an iPhone, head to Settings. In 'General > Reset', select 'Erase All Content and Settings'.)
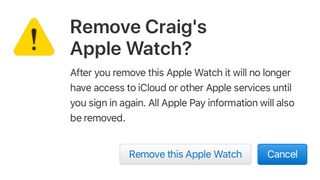
To keep track of devices your Apple ID is currently signed into, peruse the Devices section of the Apple ID website. In each case, you can select an item, which will outline its model, OS version, and serial number. Those items tied into Apple Pay are clearly marked.
Click Remove from account to delete a device from your Apple ID. You’ll need to confirm this action, which will also remove all Apple Pay information from it. Should you later want that device to use your Apple ID, you’ll have to sign in again in the usual way.
Turn on two-factor authentication
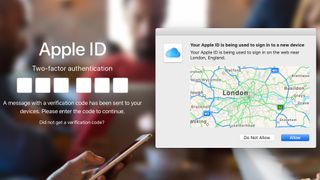
Apple offers two-factor authentication. When it’s active and you want to sign into a new device, you’ll need to verify your identity via a code sent to a trusted iPhone, iPad or iPod touch running iOS 9 or later, Apple Watch running watchOS 6 or later, or a Mac with OS X El Capitan or later.
Two-factor is easily set up in Settings on iOS/iPadOS: tap your name, then Password & Security, then Turn On Two-Factor Authentication. You’ll need to input details for a trusted phone number to receive verification codes. On Mac, the equivalent settings are in 'System Preferences > iCloud > Account Details > Security'.
In the Apple ID website’s Security section, you can add further numbers. Apple recommends doing so for when you can’t access your primary number. Do not, however, include a phone owned by someone else – instead, use another number you alone have access to.
Also, be mindful Apple’s 2FA system is imperfect, in treating browsers as distinct devices. So it’s feasible someone could steal your Mac, sign into the Apple ID website, get a 2FA window on that Mac, and then get access to your Apple ID settings.
Protect yourself against that possibility by securing the Mac itself with a complex password (or Touch ID if that’s available), and also by not using browser autofill for your Apple ID. (If you’ve already stored it, remove it in Safari’s Passwords preferences.)
Create impenetrable security answers
In the event you don’t want to use two-factor authentication, you can instead opt to protect your account with security questions. These may be asked of you when you use your Apple ID online or contact Apple support. The snag: generic questions are easily socially engineered. Think about it: how difficult is it really in an age of social media for someone to find out where you went to school or your mother’s maiden name?
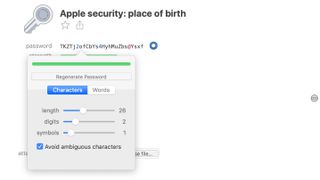
You can’t do anything about Apple’s questions, but you can protect yourself by obfuscating the answers. You could, for instance, state that your town of birth is in fact ‘radish’. Better: use a password manager again, and create a unique randomized string for each answer, which only you could possibly know. Save those in your password manager, so only you have access.
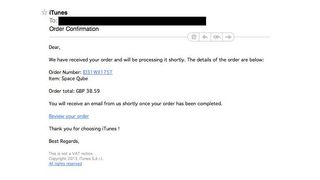
Be wary of phishing emails/text messages
Phishing emails are those that attempt to look like the genuine article, encouraging you to sign in to your Apple account. Mostly, even a cursory glance reveals something fishy – suspect design; an inability to spell. But often they rely on making you fearful, for example by stating your account has been locked or compromised, or that a large purchase has been made that you weren’t aware of.
Never click a link from one of these emails; and if you ignore that advice, never sign in on a page that such an email sends you to. It might look like an Apple website, but it won’t be. Sign in, and your username and password details will be entered into a hostile system, potentially leaving you subsequently fighting to get control of your Apple ID back.
If ever in doubt about a phishing email or security alert, visit the Apple Support website, scroll down and select Get support, and make selections until you get options to call an Apple support representative.

Comments
Post a Comment