How to use Apple AirPods to a MacBook (or Mac)
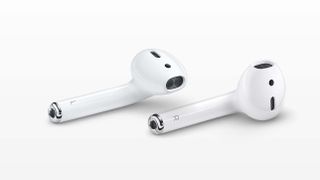
If you want to know how to connect the Apple AirPods to a MacBook or Mac computer, you've come to the right place.
Apple’s AirPods got something of a mixed reception when they were first launched back in 2016. Apart from anything else, the completely ‘wire-free’ design looked a bit odd, leaving you with two little white stalks dangling out of your ears all the time.
But, after a slow start, the idea of completely wire-free in-ear headphones has really taken off. The little white AirPods are now a common sight in my local hipster haunts, and a number of other manufacturers have been leaping on the wire-free bandwagon in recent months too.
The AirPods were innovative in other ways as well. They use a standard Bluetooth connection for streaming music, but Apple’s custom-designed W1 chip provides additional features when the AirPods are being used with other Apple devices.
Some of those features – such as the ability to use just one earpiece for taking phone calls – are designed specifically for use with Apple’s mobile devices, such as the iPhone or iPad.
However, you can use the AirPods with a MacBook laptop or Mac desktop computer as well. We’ve used a MacBook Air running Mojave (macOS 10.14), but the steps shown here will work with any desktop or laptop Mac running Sierra (macOS 10.12) or later.
Older Macs – as well as Windows PCs and other non-Apple devices – can still treat the AirPods like conventional Bluetooth headphones, although they won’t be able to use all the AirPods’ other features.
1. Pairing AirPods via iCloud
The AirPods are, of course, primarily designed for use with an iPhone. And, if you’ve already set up your AirPods to work with an iPhone or iPad that is logged into your iCloud account then they will automatically be available for use with any MacBook or other Mac that is also logged in.
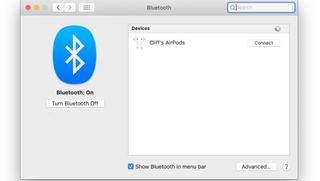
This means you can immediately see the AirPods showing up in the Bluetooth control panel on your MacBook, for example, even if you don’t have Bluetooth turned on yet.
2. Desktop controls
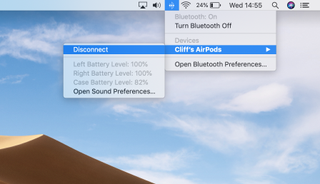
When you turn Bluetooth on, you can simply connect to the AirPods by double-clicking them in the control panel.
There’s another option as well – if you click the button to 'Show Bluetooth in menu bar' then you can quickly connect or disconnect the AirPods at any time by using the Bluetooth pull-down menu that appears in the MacBook’s main menu bar.
This menu also shows other details, such as the battery level for both the AirPods and their charging case.
3. Pairing AirPods without iCloud
If you haven’t previously set up the AirPods with an iOS device then there’s a quick way to get started – and you don’t even have to take the AirPods out of their charging case.
Make sure that Bluetooth is turned on in the control panel, then open the lid of the charging case and press and hold the little button on the back of the case for about three seconds, until the charging light flashes white.
The AirPods will appear in the Bluetooth control panel and you can just click the ‘Connect’ button to complete the pairing process.
4. AirPod options
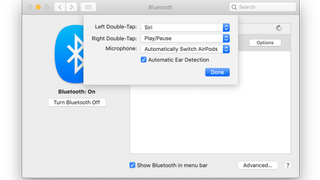
Once you’ve connected the AirPods, a new ‘Options’ button will appear. Click on this and you’ll see a number of options for controlling the way that the AirPods work. You can issue a number of commands simply by tapping twice on either earpiece while you’re wearing them – perhaps using the left earpiece to activate Siri voice commands, while the right earpiece controls your music.
The ‘automatic ear detection’ option activates a motion-sensor inside the AirPods. This will automatically pause your music when it detects that you’ve removed the AirPods from your ears, and resume playback when you put them back in again.
You can, however, deactivate the sensor and control the AirPods manually if you prefer.

5. iTunes audio
By default, the AirPods are now selected as the primary audio output device for the MacBook, and the audio from any apps running on the MacBook will be played through the AirPods.
However, it’s also possible to play audio from different apps through different devices. Let’s fire up iTunes and have a burst of Abba to brighten up a grey winter’s day.
If you click on the AirPlay icon in the iTunes menu bar then you can select the AirPods as the audio output for your iTunes music. This over-rides the system-wide default settings and tells the macOS that iTunes will always play through the AirPods.
6. Sound settings
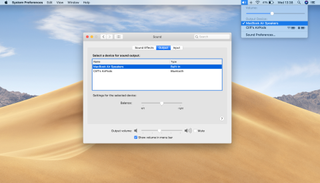
Switch back to System Preferences on the MacBook and take a look at the Sound control panel.
You can now select the MacBook’s internal speakers as the primary sound output, so you could have a PowerPoint presentation or a BBC news bulletin playing its own audio through the MacBook speakers – or a larger set of external speakers connected to the MacBook – while you carry on listening to Abba on iTunes through the AirPods.
This is handy if you sometimes need to switch between audio outputs when running multiple apps simultaneously. It’s also possible to quickly switch between the MacBook speakers and the AirPods using the 'Sound' pull-down menu in the main menu bar.

7. Hey Siri!
Like the iPhone and iPad, most recent Mac models can now use Siri voice commands and, as we mentioned earlier, you can activate Siri simply by tapping twice on one of the AirPod earpieces.
The microphones in the AirPods will detect your voice commands, which means that you don’t have to be sitting right in front of the MacBook to talk to Siri. You can use Siri to ask about news or weather reports, create notes and reminders, and even tell it to ‘open Safari and go to TechRadar.com’.
8. Find my AirPods!
The Find My iPhone app on iOS devices can be used to locate all of your Apple devices in case they are lost or stolen – and that includes your AirPods too.
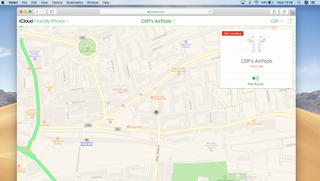
There’s no macOS version of that app, but Find My iPhone is available as a web-based service on the iCloud.com website.
You can log into iCloud.com using your Apple ID and a web browser on a Mac or Windows PC, and Find My iPhone will show you a map with the last known location where the AirPods were in use with a Bluetooth connection.

Comments
Post a Comment