How to clean your keyboard

Figuring out how to clean your keyboard may be the last thing on your mind when you’ve just bought a shiny new laptop or a new typing peripheral. But, every PC user knows that dirt and grime can pile up overtime, and you’ll eventually face the inevitable.
With keyboards, it’s even trickier. If you don’t already know how to do it, it’s probably hard to just instinctively know how to clean your keyboard properly with all its moving and electrical parts – not to mention, its nooks and crannies. It isn’t just a simple scrub and wipe job. You also have to be careful, so you won’t cause irreversible damage to your device. That’s on top of the fact that dirt and sebum stains are surprisingly hard to rub off.
So, we figured we’d give you a hand with a few useful tips. Here are different ways to clean your keyboard, whether you’re only doing the usual everyday care or a proper deep clean. That way, no matter what kind of mess, you’ll know how to clean your keyboard.

Everyday messes are unavoidable, especially if you’re used to snacking at your desk or having a meal while working. Unless you're really, really careful, your keyboard will see its share of food particles getting stuck under its keys. Here are few things you can do when that happens:
1. Shake off loose debris.To remove loose debris, you need to first unplug your keyboard from your computer or turn your laptop off. Then simply turn your keyboard upside down then shake it until the debris is gone.
2. Use compressed air.If you’ve got debris stuck between the keys and a simple shake isn’t enough, use a can of compressed air to knock it loose. You can also use a rocket blower, but canned air is much more effective and readily available in stores like Amazon.
Cleaning spills

Beverage spills are even harder to deal with. But, don’t worry: just because you spilled liquid on your keyboard, that doesn’t mean you have to buy a new keyboard or laptop.
1. Shake off liquid.You must immediately turn off your laptop or unplug your keyboard if you spilled liquid on it to prevent damage. Away from your other devices, turn your keyboard upside down, shake it and keep it upside down to get most of the water out.
2. Clean with a lint-free cloth.To blot out any remaining droplets, use a lint-free microfiber cloth (or any clean absorbent material like paper towel or a t-shirt, if nothing else is available). Then leave the keyboard to dry completely for at least 24 hours – but preferably, up to 48 hours if you can spare it. Do all this while keeping the keyboard in its upside-down position.
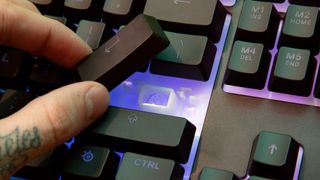
3. Deal with those sticky keys.If you spilled any other liquid other than water, make sure to check each key if it’s sticky. To clean sticky keys, gently and carefully pop off the keycaps with a butter knife or a screwdriver, taking care to note their individual placements. If you’ve got a laptop, check with the manufacturer to double check that those keycaps are removable.
Rub the sticky stain off on the keyboard base and the keycaps with a clean cloth and some alcohol solution or warm water. For hard to reach spots on the keycaps, consider using a soft-bristled toothbrush. Leave them out to dry completely before you place them back on.

Cleaning your keyboard weekly is best in order to keep it clean and avoid having to spend a couple of hours deep cleaning your keyboard. Doing so will also keep it free of harmful microbes and viruses that could get you sick. Just remember to do all the steps while your keyboard is unplugged.
1. Remove debris.Shake off loose debris or use compressed air between the keys to remove pieces of food, dust and other particles. You might also consider investing in a mini keyboard vacuum cleaner, which lets you do this step faster and more efficiently. There are also sticky cleaning goo gels available that are also very effective.
2. Clean the keys.Using a cotton swab or cloth, remove dirt and oil/sebum from the keycaps and between the keys with isopropyl or rubbing alcohol – doing this weekly should prevent buildup as well as kill harmful germs. Dry thoroughly with a lint-free cloth.
Deep clean

Deep cleaning your keyboard can take a bit of time, especially when you haven’t cleaned it in months. You might end up giving those yellowing keycaps a proper scrubbing individually, as well as cleaning a keyboard base that’s harboring layers of dust, food particles, skin cells, hair and other things. This is why a weekly cleaning of your keyboard is highly recommended.
1. Scrub those yellowing keys.Dirt and oil/sebum buildup are surprisingly difficult to scrub off so this part takes time and patience. Pry each keycap off carefully with a butter knife or a flathead, remembering to note their individual placements.
Then, wash them individually with soap and water or isopropyl alcohol. If the stains are particularly tenacious, you can use cotton swab or a soft-bristled toothbrush with alcohol for scrubbing.
2. Deal with that keyboard base.Use a can of compressed air or a keyboard vacuum cleaner to remove any loose materials sitting on your keyboard base.
When done, scrub the grime buildup on your keyboard base with a cloth or cotton swab and water or isopropyl alcohol. Wipe it completely dry with a lint-free cloth before replacing those keys.

Comments
Post a Comment