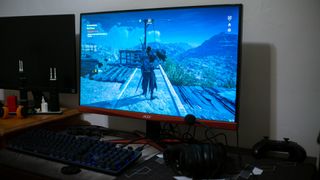
How to enable G-Sync on a FreeSync monitor

Welcome to our guide on how to enable G-Sync on a FreeSync monitor. For the better part of the decade, PC gamers have had a tough call to make to get smooth frames without screen tearing in their games. V-sync offers one route to smooth out rendering, but can introduce stutter and input lag. Meanwhile, Nvidia’s G-Sync and AMD’s FreeSync have been two walled gardens, requiring specific hardware to take advantage of.
The issue was that there needed to be support across multiple devices to get the adaptive sync features working, and crossing brand lines between Nvidia and AMD made it impossible. To use the adaptive refresh rates of a FreeSync monitor, you needed an AMD graphic processor that supported FreeSync. And, to use G-sync, you needed both an expensive G-Sync monitor and an Nvidia graphics card at least Maxwell (i.e. the GTX 960) or newer.
Pairing Nvidia graphics with a FreeSync monitor, and vice versa, left the technology sitting idle. But, Nvidia has made a huge shift to that dynamic. Now, recent Nvidia graphics cards will support adaptive sync on previously unsupported monitors, including FreeSync models.
If you’re looking to start gaming with G-Sync on a FreeSync monitor, here’s what you need to know and what you can expect.
?What exactly is G-Sync
G-Sync is simply Nvidia’s technology for matching the refresh rate of a gaming monitor to the frame rate of a video game.
Since video games can have wildly varying demands on hardware from moment to moment, graphics cards rarely maintain a perfectly consistent frame rate. You may see a GPU deliver 100fps only to quickly dive down to 40fps when a bunch of action kicks off.
And, when the frame rate running on your PC differs from the monitor’s refresh rate, issues emerge. There may be tearing as the monitor displays parts of two different frames or stutter when the monitor repeats frames while waiting for new frame data. G-Sync prevents visual issues like these by ensuring the monitor doesn’t refresh faster or slower than the game’s frame rate.
?Which GPUs are supported
Nvidia is enabling G-Sync for variable refresh rate monitors on GTX 10-Series and RTX 20-Series graphics cards. If you’re running an older GPU, you’re out of luck. Your graphics card will also need to connect to your monitor via DisplayPort. So, if you have a gaming laptop with only an HDMI output, you may also be left out.

?Which variable refresh monitors support G-Sync
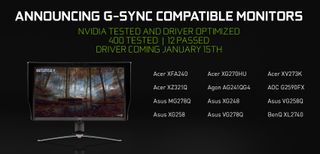
Nvidia claims to have tested 400 monitors with variable refresh rates to ensure gamers know which will work effectively with G-Sync. Out of this group only 12 have passed so far, and Nvidia has labeled the best performing monitors as “G-Sync Compatible.”
Monitors that have received this designation passed tests ensuring they offered large variable refresh rate ranges greater than 2.4:1 (with most offering at least 48-144Hz), so the window is wide enough between the lowest and highest refresh rate for gamers to benefit. They also ensure the monitors don’t blank, pulse, flicker, ghost or present other artifacts with G-Sync enabled.
At this time, 12 monitors have the G-Sync Compatible designation:
- Acer XFA240
- Acer XG270HU
- Acer XV273K
- Acer XZ321Q
- AOC Agon AG241QG4
- AOC G2590FX
- Asus MG278Q
- Asus VG258Q
- Asus VG278Q
- Asus XG248
- Asus XG258
- BenQ XL2740
However, even if your variable refresh rate monitor isn’t listed, you can still enable G-Sync. There may be issues, but you have the option of testing it out and deciding for yourself whether the benefits are worthwhile.

?How do I use G-Sync on a FreeSync monitor
To start, you need to make sure you’ve updated your Nvidia drivers to at least Version 417.71. Support was enabled on January 15, 2019, so drivers dated before this will not work with FreeSync monitors.
You’ll also need to ensure your Nvidia graphics card and monitor are connected via DisplayPort. Also, check your monitor’s settings to confirm variable refresh rates are enabled.

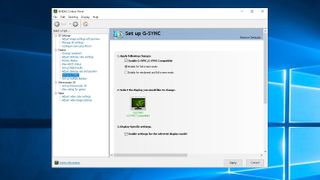
If your monitor is one of the G-Sync Compatible models, then G-Sync should automatically enable itself, as should variable refresh rates. If not, you can manually enable G-Sync using the following steps:
- Open Nvidia Control Panel
- Got to “Display: Set up G-SYNC”
- Check “Enable G-SYNC G-SYNC Compatible” and select your preferred options
- Select your monitor
- Check “Enable settings for the selected display model”
- Apply settings

?How well does it work
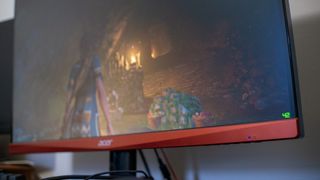
Just how well G-Sync works is largely going to come down to what settings you’re using in your games and what monitor you’re using it with. Our experience has been generally positive with G-Sync enabled on a G-Sync Compatible monitor.
If you’re playing a game at such high settings that you can’t consistently keep your frame rate within the monitors variable refresh rate range, then the experience won’t be positive. If your game does run within that variable refresh rate range, though, it should be a smooth experience without stutter or tearing.
Gaming with too high of a frame rate can also cause issues. So, it’s best to keep your game’s frame rate limited slightly below the maximum refresh rate of your monitor. You can see the variable refresh rates of G-Sync and G-Sync Compatible monitors at Nvidia here.
As G-Sync is similar to V-Sync in some ways, gamers may be concerned about introducing input lag. However, YouTuber Battle(non)sense has done thorough testing of input lag for G-Sync on a compatible monitor, and found that limiting the max frame rate while V-Sync and G-Sync were enabled did not introduce input latency – curiously, latency was actually reduced.

Comments
Post a Comment